
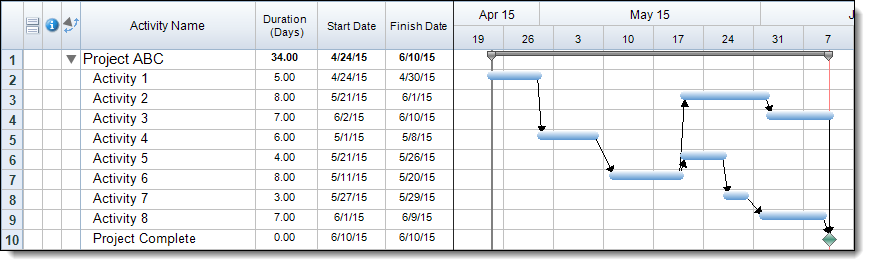
When setting up projects we often try to enter our tasks and activities in a chronological order. This allows us to easily view the schedule and visualize the flow from one activity to the next. However, in some cases we may not always know the exact dates that everything will occur as we build the outline for the schedule. When this happens, as we start to enter dates, tasks may no longer appear in their true chronological order. In these cases users may want to re-sort their data into chronological order to easily see the flow from start to finish.
In FastTrack Schedule 10 users can easily sort data on the fly, within any column in their schedule. As we can see in the schedule below, our start dates are currently out of order so tasks appear scattered throughout the schedule.
In order to fix this and make it easier to visualize the flow of the schedule from start to finish we can easily apply a sort to the Start Date column. To do this, Right-Click or Control-Click on the Start Date column header and select Sort Ascending. As soon as we do this the activities are automatically reordered from earliest to latest start date.
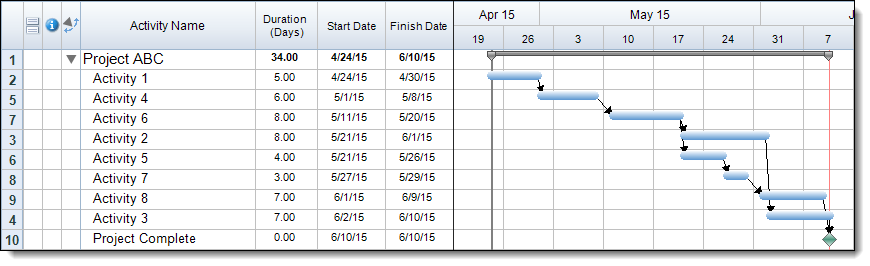
Even though we can now easily see the chronological order of the tasks one thing that you may notice is that the Row Numbers have not been reordered, instead they have been maintained with their original activities. This is because sorts are normally a temporary item within a schedule, most often used for reporting on project data. If users however want to set this sort as the new “standard” order from the schedule they can instead apply the sort as a Master Sort. A Master Sort will apply the same sort, and it will also renumber the rows according to their new position in the schedule, so everything will appear in its chronological order in all locations.
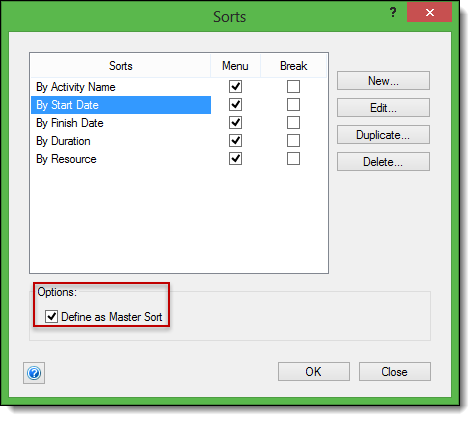
To apply a Master Sort first remove the existing sort by selecting the red Restore All icon in the bottom left corner of the screen. Once the sort has been removed we can then reapply and set it as the master. To do this go to Project > Sorts > Define. Within the Sorts Dialogue select By Start Date, then also select the box labeled Define as Master Sort.
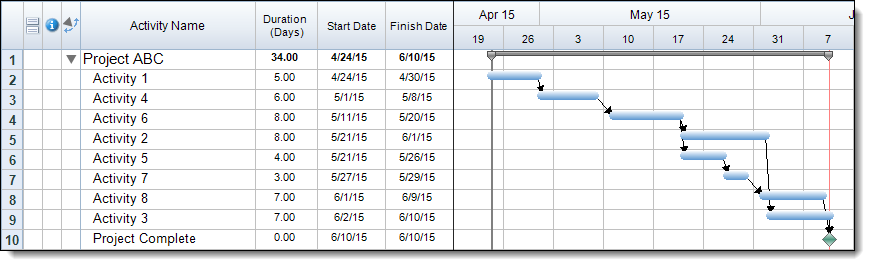
After selecting these options select OK to apply the sort and close the dialogue. As we can now see in the schedule below, the activity start dates are once again sorted in ascending chronological order. At the same time the row numbers have been reordered according to their new positions in the schedule. You’ll also notice that the red Restore All icon has been removed from the bottom left, indicating that this is now the “standard” order of the schedule.
Using options such as Master Sorts can allow users to easily reorder their schedules on the fly. So even if the schedule was not originally setup in a chronological order, users can easily set it back to that as they continue to work in and update the status of their projects. If you’ve ever built schedules that aren’t displayed in chronological order, how can applying a Master Sort help you to better visualize or manage your project information?
