In many projects, we are required to track significant changes in our projects. These changes can include items such as status approvals or points of completion in a project. One way of managing these changes is by using Baselines. Baselines, allow us to capture key data, at any point throughout the project. There are, however, other uses for Baselines in our projects as well.
One key use of Baselines is the ability to create “What-If” scenarios, where one can plan multiple versions of a project to find which will be the most effective in the actual implementation. In FastTrack Schedule 10, users have the ability to capture up to 10 unique Baselines in any file. Baselines capture data stored in several “Scheduled” columns including; Duration, Start Date, Finish Date, Total Cost, and Work.
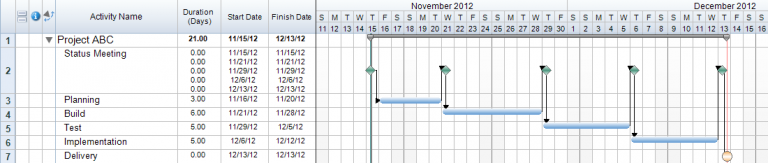
Our first step is to enter all schedule data for our project. In the image below, we have a simple file that has multiple tasks with resources assigned to tasks in order to track work and costs.

In the method we are using Baselines for, the idea is to build several versions of our project, typically by changing Dates/Durations or Resource Assignments. As we do this, we can save baselines in order to compare which versions of the project may be the best fit based on items such as Total Project Duration, Total Resource Work, or Total Project Cost.
Once we have entered our schedule data, we are ready to save our first Baseline. To do this, go to Tools > Progress Tracking > Save Baseline. When we select to save the baseline, we can choose where to save it, from Baseline 1 -10. Here, we will select Baseline 1 and then select OK.

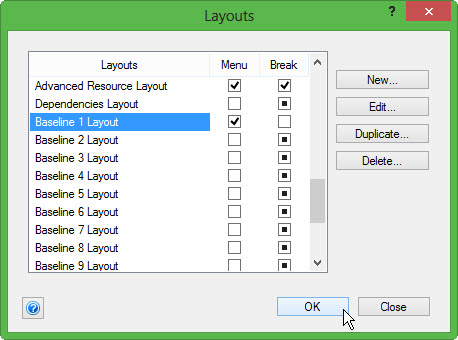
As soon as we select OK, data from our “Scheduled” columns is automatically copied to specific Baseline 1 columns. To view this data, we can switch to a pre-defined Layout. Go to Layouts > Define and scroll down to the layout called Baseline 1 Layout. Select the layout from the dialog and then select OK to switch to this layout.
When we select OK, we will switch to our Baseline 1 Layout to see all of the data that has been captured for this Baseline. In the layout we will see the following Baseline data: Duration, Start Date, Start Time, Finish Date, Finish Time, Work, and Cost.

Now that we have saved our first baseline, we can change our “Scheduled” data to reflect another planning of the project. As we change data such as Task Duration, we will automatically see how other “Scheduled” data such as Start/Finish Date, Work, and Cost change as well.

After we have entered our new “Scheduled” information, we can once again save a Baseline by going to Tools > Progress Tracking > Save Baseline > Baseline 2 > OK. Since we save our data this time to Baseline 2 we will now be able to compare both versions of our project. To see both sets of Baseline data at once, we will need to create a Customized Layout which combines our Baseline 1 and Baseline 2 Layouts.

Now that we can see both sets of data at once, we can easily compare key items to determine which version of the project will give the best result. Since we have the ability to save up to 10 total Baselines, we can continue to modify our “Scheduled” data to play out every possible scenario within the project. As we do this, we can create different layouts to compare small sets, or all data at once. We can even use features such as Summary Graphs to compare which version of the project will have the optimal cash flow.
Looking outside of the typical use of Baselines, there are many additional uses that we can find for this feature. Have you ever utilized Baselines to plan “What-If” scenarios in your projects? Sound off in the comments with additional ways that you’ve utilized baselines within your own projects.