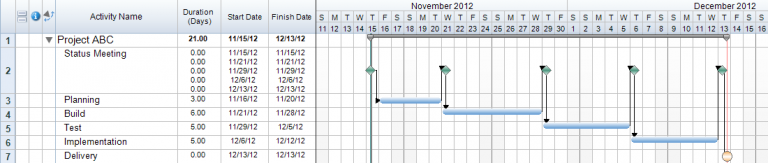
In project management there are often times when we plan all of our projects for the year in advance just to become aware of what the potential workload may look like. When we do this we don’t always set exact dates for when tasks should occur, oftentimes we simply set a duration for how long it should take to finish a task. As the project grows closer to its starting point we need to update our schedule to show the true time frame of when the project will occur. Depending on how the project was created we have several options for shifting all tasks to the newly planned start date. Only one of these methods however will also let us shift any additional graphical data that we have added to our schedule, such as text boxes or images inserted in the Timeline Graph. In FastTrack Schedule 10 we can easily shift our entire project as well as the graphical items in a few simple steps. First let’s take a look at how our schedule currently appears with all of the tasks and graphical items that we have entered at this point.
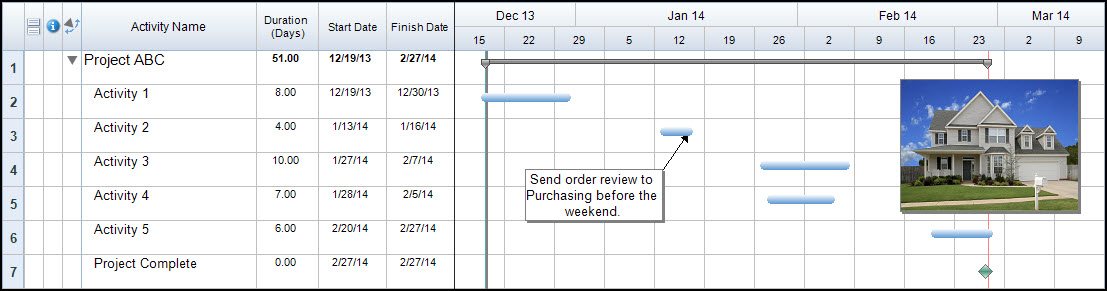
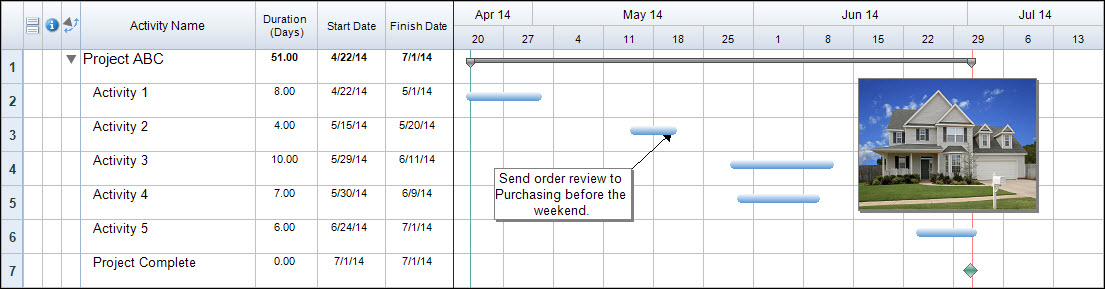
Here we can see a basic outline of tasks as well as an added text box indicating a deadline and a picture of the home we are doing work on. In this case, we have planned the project in the month of December but it may actually not begin until a few months into the next year. As the date when the project will truly begin becomes clearer we can then go back into our project and simply shift the tasks and graphical items. Go to Tools > Shift > Schedule. This will open the Shift Schedule Dialogue.
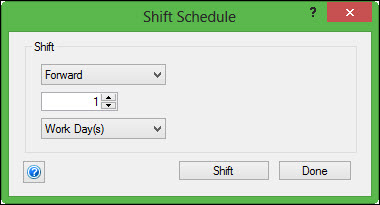
From here we can enter the exact number and type of units that we wish to shift our schedule. We can even choose to shift our schedule forward or backward in time. First we can select the time unit that we wish to shift the project by. The default here is Work Days, however we will choose to shift the project in Work Months. I am going to shift my project forward 4 months because I now know that it will be starting towards the end of April.
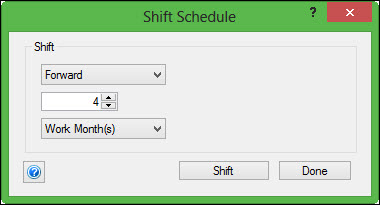
After you have entered the number and type of units select Shift; this will cause all tasks within the project to shift forward 4 months from their previously entered start dates.

We can see here that as soon as we shift the project all of the graphical items within the Timeline Graph have shifted as well. This means that we will not have to go back and manually move these to match visually with their original locations. If you do need to reposition certain graphical items separate from the rest of the schedule this is still possible. For example: perhaps we would like to shift our image backward by a few days to give a better visual balance to the schedule. Once again go to Tools > Shift > Items. While in the Shift Items Dialogue we can select exactly which items to move: Pictures & Legends and/or Text Boxes. Here we will select to only shift Pictures & Legends so that our text box will stay where it is currently positioned. We can shift this task back so it lines up with the start of the previous week, June 15th. To do this we can shift the image 3 Days Backward. The reason that we have selected Days instead of Work Days here is to also account for weekend non-work days in the project.
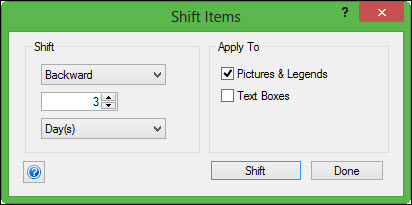
As soon as we select Shift we will see just the image that is currently entered in the Timeline Graph move back 3 total days.
Now we can easily use the Shift tool to move all of our tasks and graphical items at once, or move specific kinds of graphic items as our schedule updates to new dates. How can you utilize the shift tool to move tasks or better position graphical items within your schedules?